Pumpkin Curry

Pumpkin Curry

Woah! It’s Halloween! Man, October flew by and here we are on the threshold of another holiday season. Being a new homeowner, I am attempting to add more and more personal touches to make our house feel like a home. One of my favorite Halloween decorations I made were these luminaries to light the path of the trick or treaters in our neighborhood. Super easy, super cute. Thanks, Southern Living, you’re a pal.

As tempting as it was to post a sweet dish on here for Halloween, I figure you’ll get enough of them in the upcoming holiday season. If you have a sweet tooth, you’ll definitely want to come back here in December. We have big plans, folks, big plans. Anyhow, we’ll continue with a mouth watering seasonal savory dish today!

We posted a version of this recipe long ago, but after rereading it, all I wanted to do was revise it. Now, the cooking time is shortened, the ingredient list is shorter, and the culinary skills are way more logical. It’s like a new, healthier, tastier version of what you may have seen previously on this site.

This is a great recipe for using those darling little pie pumpkins you are decorating with for fall. A bonus: this recipe is paleo friendly, vegan, and sugar free! It only takes a few hours in the crock pot, so it’s perfect if you get home in the afternoons (like me) from work. Enjoy, Happy Halloween, and we’ll chat again real soon!
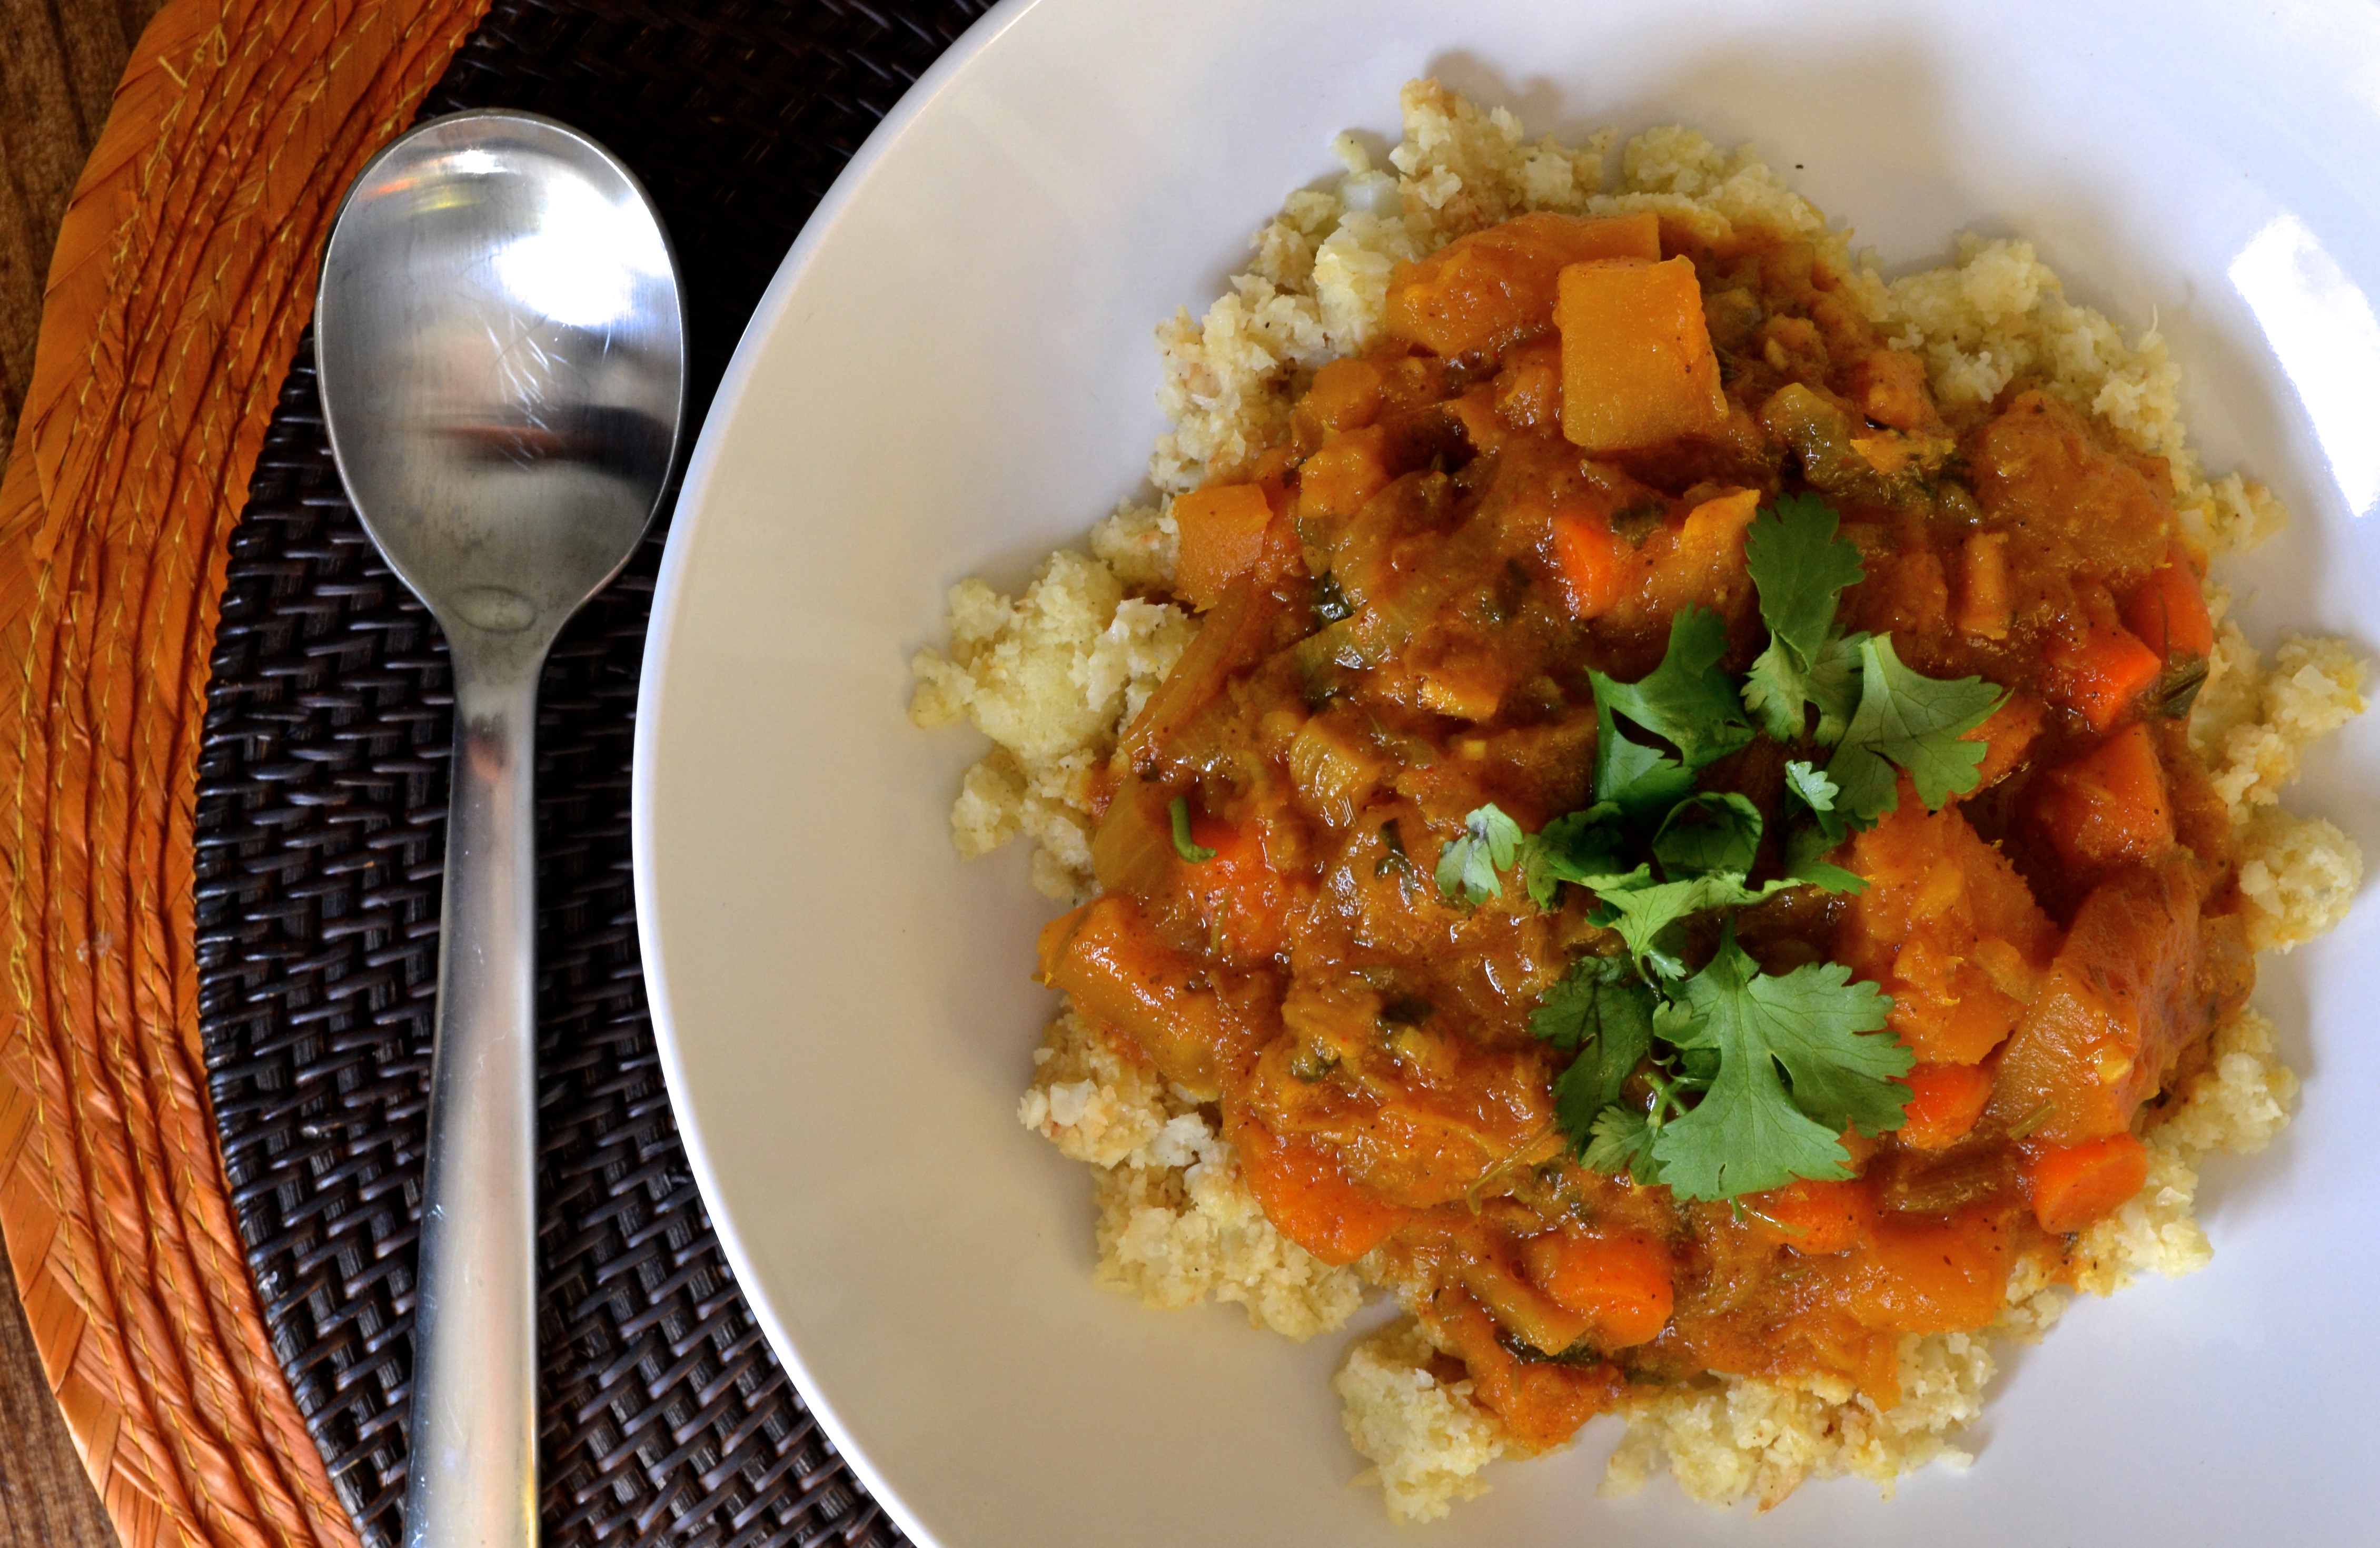
Pumpkin Curry
Prep Time: 60 min. (includes roasting the pumpkin) Cook Time: 3-4 hours

Ingredients:

2 whole pie pumpkins
4 tablespoons olive oil
2 teaspoons kosher salt
2 teaspoons black pepper
1 onion, sliced in half moons
2 cups baby carrots, halved
½ bunch cilantro, chopped
6 cloves garlic, minced
1 cup chicken stock
14-oz. lite coconut milk
1 tablespoon red curry paste
1 tablespoon fish sauce
1 teaspoon turmeric
1 teaspoon red pepper flakes
1 teaspoon chili powder
1 lime, juiced

Preparation:

Preheat oven to 350°F.

On a sturdy cutting board, remove the stem of two pumpkins, and slice pumpkins lengthwise. Dispose of pumpkin seeds and strings. Cut each half again lengthwise, and place the eight pieces of pumpkin on two baking sheets. Drizzle with 1 tablespoon olive oil, and sprinkle with salt and pepper. Roast pumpkin in the oven for 45 minutes, or until pumpkin is soft when pierced with a fork. Allow to cool and peel off the pumpkin skin using a knife. Cut pumpkin into 1″ cubes. Place cubed roasted pumpkin pieces in the crock pot.

Meanwhile, prepare the curry. In a medium sized skillet, heat 3 tablespoons olive oil over medium. Once hot, add onion and carrots. Saute until onions are translucent, about 5 minutes. Season with salt. Then, add garlic and red curry paste. Simmer for another minute.

Transfer vegetable mixture to crock pot on “low” setting. Add remaining ingredients and stir. Cover crock pot with lid and cook for 3-4 hours on low.

Serve curry over cauliflower rice (one head of cauliflower, food processed and sauteed with a bit of olive oil, salt and pepper), and top with fresh cilantro.

Serves 8

Mini Pumpkin Cheesecakes with Gingersnap Crust

Mini Pumpkin Cheesecakes

Another pumpkin post! I have never been a fan of cheesecake (I know, I know…), so last year I began creating my own recipe that even I would enjoy. What turns me away from  cheesecake is the dense texture and overly cream cheesy flavor, so in this new recipe I incorporated ricotta and greek yogurt to sub for some of the cream cheese. I don’t think it’s really any healthier, but the texture is light and fluffy. These are so easy to make.

Simply plop one gingersnap cookie in the bottom of each lined muffin tin, and your crust is done. I don’t often recommend against using Trader Joe’s brand, but since I learned the hard way, I have to: their cookies are just too small. I used Target’s gingersnaps and they were perfect for this recipe.

DSC_0129

Just whip up the filling and pour into each cup. Bake, cool, top with whipped cream and sprinkle with cinnamon. These individual cheesecakes are bursting with the spicy sweet flavors of fall. Enjoy!

DSC_0190

Mini Pumpkin Cheesecakes with Gingersnap Crust

Prep Time: 12 hours (includes overnight chill) Cook Time: 24 min.

Ingredients:

For the Cheesecakes:

24 gingersnap cookies

1/2 cup whole milk ricotta cheese

8-oz. plain cream cheese, room temperature

2 tablespoons plain greek yogurt

1/2 can pumpkin purée

2 eggs

1/3 cup light brown sugar

1/3 cup granulated white sugar

1/2 teaspoon vanilla extract

1 teaspoon pumpkin pie spice

For the Whipped Cream:

1 cup heavy whipping cream

1/2 cup powdered sugar

1 teaspoon vanilla extract

Ground cinnamon to sprinkle

Preparation:

Preheat oven to 350°. Using an electric mixer, whip the ricotta and cream cheese together until fluffy. Add the greek yogurt and pumpkin and continue to whip. Add the eggs and continue to whip. Finally, add the brown sugar, white sugar, vanilla, and pumpkin pie spice and blend until well incorporated. Set aside.

Line two muffin tins with paper liners. Place one gingersnap cookie in each muffin liner and press to the bottom. Top the cookie with the cheesecake filling, almost all the way to the top. Bake for 22-24 minutes or until inside of the filling jiggles a little, but when touched the batter gently bounces off your finger. Transfer to a wire rack and cool completely before topping with whipped cream.

To make the whipped cream, beat the heavy cream, powdered sugar, and vanilla together until stiff peaks form. Use a piping back or decorating tool to top each cheesecake. Sprinkle with ground cinnamon as desired.

Chill overnight and enjoy the next day. Makes 24 individual cheesecakes.

DSC_0223

Pumpkin Scones

Pumpkin Scones

The other day, I went to Starbucks to get my seasonal favorite #PSL, (I have to use the hashtag, right?), and decided to order a scrumptious fall baked good to compliment my beverage: a pumpkin scone. I was shocked when the barista explained to me that they have “temporarily discontinued” the pumpkin scones because “stores can’t keep up with such high demand.” …Wha??! Anyhow, still craving a pumpkin scone, and with a free afternoon in our new kitchen, I was determined to make my own.

DSC_0021

These turned out even better than the original. Not dry (yes, you could use the M word here- my least favorite word that rhymes with “hoist”), sweet, with the right amount of fall spice and covered in frosting. Your day is sure to start off right with one of these and a coffee in hand.

Simply mix the dry and wet ingredients in separate bowls, cut the butter into the dry ingredients, and add wet to dry.

DSC_0034

Then, form the dough into a one inch-thick rectangle, keeping the dough as cold as possible. If you have a marble pastry board, now would be a great time to use it. If not, do what I did and work on your counter.

DSC_0042

Next, divide that dough with a sharp knife or pastry blade into thirds.

DSC_0046

Next, cut the thirds in half, creating six large scones.

DSC_0055

Pop these babies in the oven and when they’re done cover in as much vanilla frosting as you’d like. The warm scones will soak some of the frosting into their nooks and crannies, still with plenty on top. Really go for it here, folks… check out the little puddles of goodness that formed underneath. At this point in the baking process, Neil just happened to arrive in the kitchen and graciously volunteered to take the parchment with the extra frosting. We wouldn’t want it to go to waste, after all.

DSC_0060

The easiest (and prettiest) way to drizzle the spiced frosting is to use a squeeze bottle, but you could always use a whisk. You might have some frosting left over, but you can save it for future dunking and drizzling.

DSC_0074

There is nothing like baking on a cool fall day. Happy fall, my dear friends!


Pumpkin Scones

Prep Time: 30 min. Cook Time: 14 min.

Adapted from: Top Secret Recipes

Ingredients:

For the Scones:

2 cups all-purpose flour

1/4 cup white granulated sugar

1/4 cup light brown sugar

1 tablespoon baking powder

1/2 teaspoon salt

2 teaspoons ground cinnamon

1/2 teaspoon ground nutmeg

1 pinch ground clove

8 tablespoons unsalted butter, cold

1/2 cup pumpkin purée

1/4 cup heavy cream

1 teaspoon vanilla extract

1 egg, lightly beaten

For the Vanilla Frosting:

2 cups powdered sugar

1/4 cup heavy cream

1 teaspoon vanilla extract

1 pinch salt

For the Spiced Frosting:

2 cups powdered sugar

1/4 cup heavy cream

1 teaspoon vanilla extract

2 teaspoons ground cinnamon

1 teaspoon ground nutmeg

1 pinch ground clove

Preparation:

Preheat oven to 425°. In a large bowl, mix together the flour, white sugar, brown sugar, baking powder, salt, cinnamon, nutmeg, and clove. Dice the butter and cut it into the flour using a pastry blade until the flour and butter resemble small peas. Set aside.

In a separate smaller bowl, combine the pumpkin, cream, vanilla, and egg. Fold the wet ingredients into the dry ingredients until combined. At this point, pick up the dough and knead on a floured surface about 5 times until well combined. Don’t work the dough too much, though.

Form dough into a long rectangle, about an inch thick. With a sharp knife or pastry blade, cut the dough into three pieces, then cut each of those pieces in half. Transfer to a baking sheet lined with a silicone mat and bake for 14-16 minutes.

While scones are baking, make the frosting. Using an electric mixer, combine all ingredients of the vanilla frosting together until smooth. Taste to make sure you like the frosting. Using a spatula, slather each scone in the vanilla frosting. The more the better, and it’s best to do this while the scones are still warm. Allow to cool while you made the spiced frosting.

In the same bowl, use an electric mixer to combine all ingredients of the spiced frosting together. Again, taste and make sure you like it! Transfer to a squeeze bottle and drizzle over each scone.

Enjoy! Makes 6 large scones.

Banana Shake

Banana Shakes

No, we didn’t go anywhere. It’s been kind of crazy in the lives of the Ostercamps lately. We went to Florida on vacation. School and work started again. We had family in town. And oh hey, we bought our first house!! All that to say, thanks for sticking with us as our posts have been few and far between over the past month. We are super excited about our first place. Remember those previous posts that made me tear up as I wrote about how much we love our village? We are fortunate enough to have bought a little corner of that village. Right now, it’s a mess over there as my brother-in-law, uncle, and husband are completely renovating the bathroom. I mean, sledgehammering, ripping out dry wall, putting in new flooring and more.

In the mean time, the school year has started and everyone around town is getting back in the swing of things. Each new school year, I find the opportunity to get ultra organized. Not just with file folders and color coded post-it tabs (which are essential), but also at home. It’s a good time to donate summer clothes that weren’t even touched this year, organize bookshelves, recycle old magazines, and buy new school supplies. Or in our case this year, buy a new house! Second to New Year’s, I also find it fitting to make a few resolutions for the school year, such as healthy eating.

While my sister was in town, she introduced me to these delicious banana shakes. Simple ingredients, simple prep, and I kid you not, it tastes like a gosh darn banana milkshake. A lot of bloggers have featured these on their sites, and there are various mix ins, but I like this recipe as foundation for anything fancy you care to add. For the best taste and consistency, make sure your bananas are ripe (no green, lots of brown spots), and frozen overnight.

They’re a healthy snack that your kids will look forward to after school…or, that I’ll look forward to after work. Happy new school year everyone! Prep Time: 5 minutes Cook Time: 0 minutes

Banana Shake
Prep Time: 5 minutes Cook Time: 0 minutes
Makes: One small shake

Ingredients:

1 large banana, sliced and frozen
1 large spoonful almond butter
3 tablespoons almond milk (add more for a thinner shake)
Drizzle of honey (optional)

Preparation:

Blend all ingredients together using a blender and serve cold. That’s it. Really! How easy is that?!

Mango Salsa

Mango Salsa

Hold the phone. The Newlywed Chefs are posting a Paleo recipe? As you can see from our recipe index, we’re not a Paleo couple. BUT I am trying it for a while. Wait, don’t go! Don’t go anywhere. Just because I’m doing Paleo doesn’t mean you have to. Or my husband for that matter; he certainly is not. My sister successfully did Whole30 and as per usual, has inspired me! I’d guess about half of our blog readers have or know someone who has a food allergy. So far, I’ve completed a week of Paleo eating (no grain, no legumes, no dairy, no sugar) and feel great.

I have also cut out coffee. (WHAT?!) I’ve replaced it with green tea, which still has some caffeine, just not as much as coffee. I feel more energized, not as sluggish, refreshed, and healthy after only a few days. I will keep up Paleo at least through July and then reevaluate.

Here is a great summer recipe, whether you are Paleo or PaleNO! It’s a fresh and flavorful summer side.  It’s great piled atop light flaky white fish, or served with plantain chips as an afternoon snack.

Cutting mangos can be tricky. The middles are hard and you don’t want to eat that part, so I usually cut vertically on each side around the middle, then score the mango, and slice off the cubes.

DSC_0088

The preparation for this dish couldn’t be easier! Just mix everything well in a bowl and serve at your next summer get-together.

Have you tried doing anything like the Paleo diet? What were your experiences?

Mango Salsa (Paleo)

Prep Time: 15 min. Cook Time: 0 min.

Ingredients:

2 mangos, diced

1 red pepper, diced

1 jalapeño, seeds removed and diced

1 avocado, diced

1/2 cucumber, diced

1/2 red onion, diced

1/2 cup cilantro, chopped

1 lime, juiced

1 pinch salt

1 pinch pepper

Preparation:

Place all ingredients in a large bowl, stir, and enjoy!

Spicy Black Bean and Radish Tacos

Spicy Black Bean Tacos

My husband is a really good cook. This might blow your mind, but he doesn’t write this blog. However, a majority of these recipes come from his genius mind. One of the things I love about Neil is his vision and ability to execute specific tasks in a unique and beautiful way. For example: tacos. I think, “Great, taco night. Let’s set up a bar of our favorite ingredients and go to town.” Neil, on the other hand, makes THESE. Even if you just make the sauce, it will launch your everyday tacos into orbit. It’s super spicy, so if you can’t handle the heat, just look at the pictures and skip this recipe. If you’re ready for a kick, keep reading.

We found the dried chili peppers at Whole Foods hanging up in the produce section by other dried spices. You can use a variety of peppers, but this time we tried chipotle and ancho peppers and it was a good combo.

Instead of flour, try white corn tortillas.

DSC_0007

Heat them in a small skillet then wrap them in foil to keep them warm at the table.

DSC_0014

I love the radishes in this recipe. The crunch is irresistible, and the zingy flavor pairs well with the spicy sauce.

DSC_0026

Even though the ingredient list for this one is lengthy, it won’t take you too long to make these. Trust me, it’s worth the extra ingredients to make these gluten free wonders. Once you’ve had these tacos, you won’t go back to the ordinary.

Spicy Black Bean and Radish Tacos

Prep Time: 20 min. Cook Time: 25 min.

Ingredients:

For the sauce:

1 dried ancho pepper

2 dried chipotle peppers

1 clove garlic, minced

1 tablespoon cilantro stems, chopped

1/2 orange, juiced

1/2 teaspoon kosher salt

1/2 teaspoon pepper

1 teaspoon chili powder

1 teaspoon white vinegar

1/4 teaspoon red pepper flake

1 teaspoon olive oil

For the tacos:

5 radishes, thinly sliced

1 can black beans, drained and rinsed

1 tablespoon olive oil

1/2 red pepper, sliced

1/2 white onion, sliced

1 cup pepper jack cheese, shredded

1/2 cup cilantro, chopped

1 pinch red pepper flake

1 pinch chili powder

1 clove garlic, minced

8 small white corn tortillas

Preparation:

Heat four cups of water in a kettle. In a small bowl, pour water over the peppers to rehydrate. After 30 minutes, bring hydrated peppers to a cutting board, but reserve the water. On a cutting board, remove pepper stems, and scrape out seeds. Slice peppers and place in a small food processor.

Add 1/4 cup of the water with the white vinegar, oil, and orange juice and blend in food processor. Scrape sides and add garlic, cilantro stems, salt, pepper, chili powder, and red pepper flake. Continue to blend until smooth. Add more water until it reaches desired consistency. Set sauce aside.

In a skillet over medium heat, heat 1 tablespoon olive oil. Sauté red peppers and onion slices for about a minute. Add a pinch of salt and pepper. Turn heat to low and continue to cook for 10 minutes. Add the black beans to the pan, along with the red pepper flake and chili powder. Cook for another 2 minutes, stirring frequently. Add the garlic and 1/4 cup water from the peppers and continue to cook for another 10 minutes, scraping the bottom of the pan.

Bring a separate small skillet to high heat. Add one white corn tortilla shell, and cook for 2 minutes per side until warm and spots are beginning to brown. Or, place on a cookie sheet under the broiler until lightly charred. Place shells in a foil pocket to keep warm at the table.

Serve tortilla shells with fresh cilantro, radishes, black bean mixture, and spicy sauce.

Makes 8 tacos

DSC_0045