Caesar Salad: A Guest Post by Steve Haines

Caesar Salad

We are thrilled to feature our dear friend Steve on the blog today. He’s a professional jazz bassist, teacher, hockey player, and has mad cooking skillz. Steve had us over for dinner a couple weeks ago and served this salad with the meal. It knocked our socks off and we immediately requested the recipe. He is so kind to share it with us! The flavor of this caesar is out of this world. It’s better than any restaurant or store bought dressing we’ve had. Take it away, Steve!

MacIsaac Caesar Salad, from Steve Haines

Taught to me from Canadian sailor Captain David MacIsaac, this Caesar salad is extremely rich and can stand alone as a meal in itself. I like this recipe because it doesn’t have anchovies, usually a staple in Caesar salad.

First, mash together the following with a fork:

8-14 cloves of garlic (bring it! The more you add, the more it burns. Ohhh yes)

10-12 capers

ground pepper

Then, add:

Juice from one lemon (a little more if the lemon is young)

1 teaspoon red malt vinegar

2 egg yolks

2 heaping tablespoons Dijon mustard

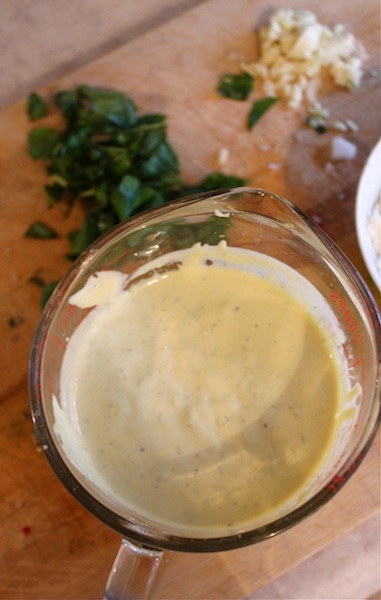
Once this is mixed up, use ¾ of a cup of extra virgin olive oil… pour 2 tablespoons in with the mixture, then use a an egg beater to froth up the dressing as best you can. The process of beating all of the oil into the mixture should take about 20-30 minutes, if it’s done correctly (There is a foofy name for this process, but I don’t remember it!) If you don’t have time, you can use a hand beater and do it all at once, but it won’t quite be the same. The result should be a thick, somewhat pasty dressing.

From there, add the dressing to Romaine lettuce, destalked and torn into bite sized pieces. You will probably use about half of the dressing for one head of romaine, and all of it for two. The dressing should be liberally added to the lettuce. Add lots of parmesan cheese, and big whole made bread croutons, if you like. I avoid the bacon. As good as it tastes, the new photos and videos out on how pigs are treated at farms have seriously turned me off to pork.

David was out at sea a great deal, but when he came home, his two vices were the Tavern, and this Caesar. It’s not for the faint of heart! I hope you all enjoy it!

P.S.- I had some sauce leftover from the recipe, and used it to top chicken and rice, which was delicious!

Cookbook Corner: Pioneer Woman Review

“It’s here! It’s here! It’s here! It’s here!!” -My words yesterday at about 5:45pm. Jumping up and down and with my heart going pitter patter, I struggled to rip open the tightly sealed cardboard like a three-year-old on Christmas morning. With the help of some kitchen scissors, I managed to open the package and was greeted by Ree Drummond smiling at me. Her second cookbook had arrived!

Folks, you have GOT to get this one. The photography, writing, and delicious recipes are an essential addition to your cookbook collection. I can not believe how many recipes there are! They are all mouth-watering but some that I am especially looking forward to making are:

-Knock You Naked Brownies

-Whisky-Mustard Meatballs

-Buttered Rosemary Rolls

-Drip Beef

-Blackberry Chip Ice Cream

-Homemade Glazed Doughnuts

Whew! Can’t wait!  There are plenty of photos of the ranch, notes about Ree’s darling family and friends, and step-by-step instructions for the recipes. Ree’s quirky writing style made me literally laugh out loud while reading. It’s $29.99, but if you order online from Barnes & Noble, you can buy it new for only $16.98.

Let’s talk about cookbook corner. Well, in the corner of our kitchen we have a breakfast table. It’s kind of the landing pad of the kitchen. We fling groceries there right when we get back from the store, we keep our vitamins there so we remember to take them in the morning, we put bills there to pay that need to go out, we write reminders and cute notes to each other there, and it acts as extra prep space while cooking or packing lunches. Also on this multifunctional table is a cookbook stand which displays a seasonal cookbook or one that is currently inspiring our meals. Can you guess which book is currently in cookbook corner?


Good guess.

Nanaimo Bars

Nanaimo Bars

Neil was born in Canada. Although he moved to the states while he was still young and doesn’t remember living there, it’s still neat that he COULD be Canadian, eh? Just like Neil, this dessert was born in Canada. It is originally from the city of Nanaimo, British Columbia. This bar is relatively simple to make, but the rich chocolate flavor is so deep it will take your breath away.  If you don’t like coconut or chopped nuts in your desserts (like Neil), just sub more graham cracker crumbs to give the bottom layer additional texture. These elegant bars are great to make for your friends, co-workers, and favorite food bloggers (that’s right- if you make these, we’d be happy to sample your version…)  Oh, and sorry for posting this during Lent.

Bottom Layer Ingredients:

1/2 cup unsalted butter

1/4 cup + 1 tablespoon sugar

1/2 cup cocoa powder

1 egg, slightly beaten

1 cup graham cracker crumbs

1/2 cup finely chopped walnuts or almonds (optional)

1 cup unsweetened coconut  (optional)

Bottom Layer Preparation:

Melt butter, sugar, and cocoa powder in a medium-sized saucepan over low heat. Once well combined but not too hot, whisk in egg. Continue to whisk until mixture is thickened, about 3 minutes. Stir in nuts and coconut. Finally, add the graham cracker crumbs about 1/2 cup at a time. Add enough so that the mixture sticks well together but is still moist. Remember, if you don’t add the coconut and nuts, just add more graham cracker crumbs. Press mixture evenly into an 8″x 8″ pan lined with wax paper. Chill for 1 hour.

Second Layer Ingredients:

1/2 cup unsalted butter, softened

3 tablespoons heavy cream

2 tablespoons instant vanilla pudding mix

2 cups powdered sugar

Second Layer Preparation:

Beat all ingredients using a stand mixer or hand mixer until light and creamy. Spread evenly over the chocolate layer (we recommend using an offset spatula) and chill for another hour.

Third Layer Ingredients:

6 ounces semi-sweet chocolate, chopped

3 tablespoons unsalted butter

Third Layer Preparation:

Melt butter in a medium-sized saucepan over low heat. Add the chocolate and stir continuously until smooth. Remove from heat. Pour cooled chocolate atop the second layer and distribute evenly with an offset spatula. Chill for about 45 minutes.

Slice into 2″ bars when chocolate has set. Store in refrigerator. Makes 32 bars.


White Chicken Chili

White Chicken Chili

Think we can sneak in one more cold weather meal this season? Why not? This comforting dish is full of flavor and easy on the wallet. It’s super easy to make and holds up well as leftovers throughout the week. Grab a bowl and dig in!

Ingredients:

2 teaspoons cumin seed
1 teaspoon ground coriander
2 tablespoons olive oil
2 boneless skinless chicken breasts
1 red onion, medium chopped
2 anaheim peppers, deseeded and chopped
3 cloves garlic, minced
2 4-oz. cans fire roasted green chilis
15-oz. can cannellini or great northern beans, drained
15-oz. can whole sweet corn kernels (or 2 cups frozen corn)
1/4 cup flour
1 tablespoon butter
3 tablespoons heavy cream
1 cup chicken stock

Preparation:

In a small sauté pan, toast the cumin seeds and ground coriander together over low heat until fragrant. Crush together using a mortar and pessel. Set aside.

Salt and pepper each side of the chicken breasts. In a large dutch oven, heat 1 tablespoon of olive oil over medium-high heat and sauté chicken for 2 minutes on each side. Transfer chicken to a plate and set aside.

Turn heat down to medium, and add the remaining olive oil. Add onion, anaheim peppers, garlic, chilis, beans, corn, and the toasted cumin/coriander mixture. Add the flour and stir until all ingredients are well combined. Cook for 2 minutes.

Add chicken stock and stir, scraping any bits off the bottom of the dutch oven. Add butter.

Cover, turn heat to medium-low, and simmer for about 30 minutes, stirring occasionally. Slice chicken into 1″ pieces and add to the chili. Add cream. Cook for 15 minutes covered, then another 10 minutes uncovered until chili is thick and chicken is cooked through.

Top with pepper jack cheese, cilantro, lime, and sour cream.

Bolognese

Bolognese

You know a dish is really really good when you look forward to leftovers while cleaning the dishes. Another sign that it’s that good is right before cleaning said dishes, you sneak just a little more of the savory sauce from the side of the pan while nobody is looking…you know you’ve done it. This is one of those dishes. Bolognese is often overlooked as just another “red sauce,” but it’s so much more. The flavors in this succulent sauce from Bologna, Italy will blow other “red sauces” out of the water. There are many versions of bolognese, but we created ours by featuring bold flavors we love and incorporating techniques from different recipes, including Anne Burrell’s and Michael Symon’s. It’s a budget friendly meal that is sure to have your family shouting “Bravo!”

Bolognese

Bolognese

Prep Time: 30 minutes Cook Time: At least 1 hour, up to 6 hours

Ingredients:

2 stalks of celery, chopped

1 red onion, chopped

4 gloves garlic, chopped

2 carrots

Kosher salt

Olive oil

3 cups beef stock

1 lb. ground beef

1/2 lb. ground pork

Freshly ground black pepper

6 oz. tomato paste

28 oz. can San Marzano tomatoes w/ their juices

1 cup red wine (optional)

4 bay leaves

1 tablespoon dried herbs (oregano, herbes de provence, rosemary, etc.)

1 lb. pasta (we recommend penne or rigatoni- something that will hold the sauce)

2 tablespoons butter

Parmesan cheese

Preparation:

Place celery, onion, garlic, and carrot in a food processor and blend on high until minced. Heat two tablespoons of olive oil in a dutch oven over medium high heat. Transfer minced vegetables to the dutch oven and add two large pinches of kosher salt. Sauté for about 15 minutes, scraping brown bits from the bottom constantly. No, you’re not burning the bottom, it will deglaze later.

Add the beef and pork and another pinch of salt and pepper. Cook for another 10 minutes, again scraping brown bits from the bottom of the pan.

Add tomato paste and brown for another 5 minutes. Next, add the wine (if using) and scrape the bits from the bottom of the pan. Add the tomatoes and juice from the tomato can. Crush tomatoes with your stirring spoon and continue to cook for 5 minutes.

Stir in three cups of beef stock, bay leaves and dried herbs. Bring to a boil, then reduce to a simmer. Simmer for at least an hour, and up to 6 hours, stirring occasionally. When your sauce becomes thick, add more stock and cook it out again. Repeat this process continually as you cook.

Fill a large stock pot with water and salt liberally. Bring to a boil. Cook pasta just shy of the recommended time on the package. Reserve 1 cup of the pasta water when pasta is drained.

Use the reserved pasta water for the final sauce reduction. Once reduced to desired consistency, add the pasta and butter and stir.

Serve and top with parmesan cheese.

Valentine’s Cupcakes (Red Velvet Oreo Cupcakes)

Red Velvet Cupcakes

Looking to impress your sweetheart this February the 14th? Look no further. These cupcakes will sweep him or her off their feet and send them floating on cloud nine. The magical part about these red velvet cupcakes is what they’ll find on the bottom of each one: an oreo cookie.

Topped with cream cheese frosting, these cupcakes have the perfect balance of sweetness. Kids will love helping by placing the cookies, mixing ingredients, and filling the cupcake holders using a no-mess squeeze bottle. Enjoy one with your honey, with a classroom of little ones, or eat the whole pan yourself.

First, line cupcake tins with 24 Oreo cookies.

Next, prepare your favorite red velvet recipe. We used Martha Stewart’s and were very pleased with the results. It will be our go-to red velvet recipe from now on! Add the batter on top of the oreos. Since some of the cupcake space is occupied by the Oreo, fill the cupcakes a little more than you typically would.

Bake according to your recipe (ours took about 5 minutes more than our recipe called for), and remove from the oven when a toothpick inserted into the cake comes out clean.

Allow cupcakes to cool and top with a traditional cream cheese frosting. Initially, we used vanilla frosting, but found that it was a bit too sweet. Cream cheese helps cut the sweetness and adds a smooth texture that compliments the cupcake nicely.

Devour with love. Happy Valentine’s Day!